Developer Guide
Content Page
- Introduction
- How to use this guide
- Getting Started
- Design
-
Implementation
- Staff
- Staff Menu
- Staff Add
- Staff Delete
- Staff List
- Patient
- Patient Menu
- Patient Add
- Patient Delete
- Patient List
- Doctor Appointment
- Doctor Appointment Menu
- Doctor Appointment Add
- Doctor Appointment Delete
- Doctor Appointment List All
- Nurse Schedule
- Nurse Schedule Menu
- Nurse Schedule Add
- Nurse Schedule Delete
- Nurse Schedule List All
- Inventory
- Inventory Menu
- Inventory Add
- Inventory Delete
- Proposed Features
- Auto Schedule Generator for Nurses
- Personalized Account Login
- Inventory Alerts
Appendix C: Non Functional Requirements
Appendix E: Instructions for Manual Testing
1. Introduction
1.1 What is HealthVault?
In light of the recent COVID-19 pandemic. The weakness of modern healthcare systems has surfaced.
Many of which are unsatisfactory in coping with the current needs.
HealthVault was thus created to improve the efficiency of hospital and healthcare information management.
HealthVault is a desktop application made for nurses as their one-stop application for recording and
accessing critical patient or staff information.
It is optimized for the Command Line Interface, where an experienced typist will be able to
make full use of the informative and minimalistic GUI to achieve significant gains in efficiency
1.2 About the Developer Guide
The HealthVault Developer guide is made specifically for those who are interested in the specifics of how HealthVault is implemented. Such personnel may include: students, technical support staff, web developers, healthcare professionals.
This Developer guide seeks to inform and instruct readers on the architecture and specific implementation of the various functions within HealthVault. So that if they wish to make any fixes or edits to improve on the code for their own usage, they will be well-equipped with both the knowledge and expertise to do so.
The Developer Guide hopes to impart to you the following:
- Properly set up for HealthVault
- HealthVault’s system architecture
- The implementation method for HealthVault’s various functions and their considerations
- Instructions for manual testing of the application
We hope you will have a fruitful time learning about HealthVault.
2. How to use the guide
2.1 Technical Terms
Command Line Interface - Accessing the functionalities of a computer program in the form of lines of text.
User Input - Any information or data sent to a computer by the user using the application.
2.2 Symbols and Icons
<> - Angles quotation marks for optional user inputs.
[] - Square brackets for compulsory user inputs.
![]() This icon denotes an important piece of information to take note of.
This icon denotes an important piece of information to take note of.
![]() Warning sign to inform user against doing certain actions
Warning sign to inform user against doing certain actions
Invalid input is shown with:
- Invalid input 1
- Invalid input 2
- Invalid input 3
3. Getting Started
![]() Caution: Follow the steps in the following guide precisely. Things will not work out if you deviate in some steps.
Caution: Follow the steps in the following guide precisely. Things will not work out if you deviate in some steps.
First fork this repo, and clone the fork into your computer.
Setting up the project in your computer
- Configuring the JDK to ensure Intellij is configured to use JDK 11.
- Import the project as a Gradle project.
- Run the seedu.duke.HealthVault and try a few commands as stated in the User Guide.
- Run the tests to ensure they all pass.
Before writing code
- If you are using IDEA, configure the code style to set up IDEA’s coding style to match ours.
- When you are ready to start coding, we recommend that you get some sense of the overall design by reading about HealthVault’s architecture.
4. Design
4.1 Architecture
Overview Architecture:
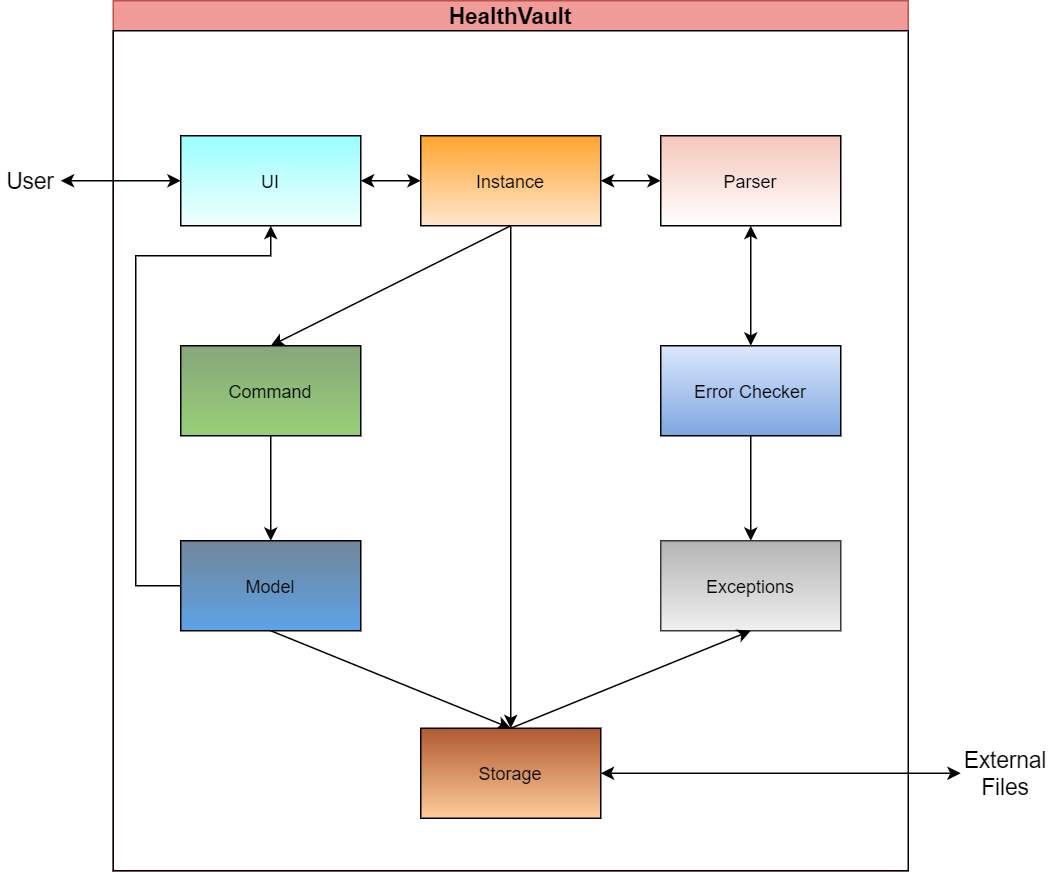
Our application utilises many layers of abstraction which allows each individual component to be self-contained yet able to work with other components. Each component has been abstracted and grouped together based on its function and purpose in the system.
The above diagram shows how each component interacts with the other components. The directed arrows represent the direction in which functions of each component is called and used. For example, the Instance Component utilises the Storage Component.
Brief Description of Components:
UI Component: Controls all the User Interface. All input and output is handled by the UI component.
Logic Component:
Instance Component: Represents all Menu Instances.
Parser Component: Parses user input to obtain control flow decisions.
Error Checker Component: Contains functions to check validity of user input.
Commands Component: Command Class Objects which executes specified actions.
Exceptions Component: All possible Exceptions identified.
Model Component: Consist of the base objects and its collection.
Storage Component: Manages all file I/O.
4.2 UI component
API : UI.java
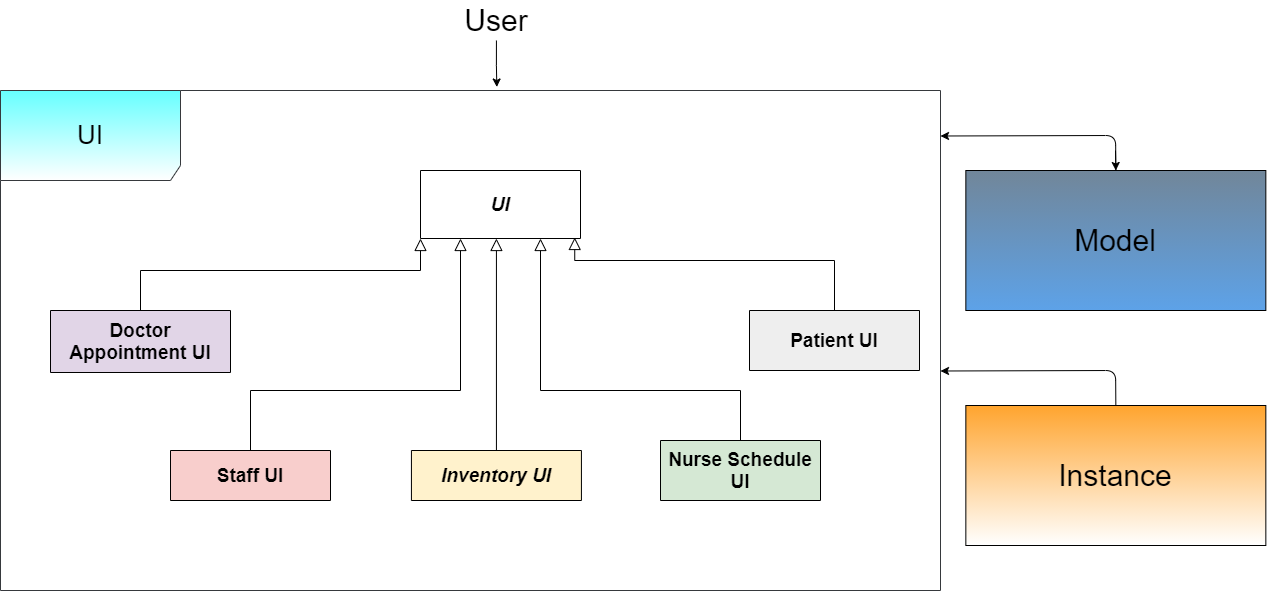
The UI of this program can be found under the package named UI. It consists of UI, DoctorAppointmentUI, InventoryUI, NurseScheduleUI, PatientUI and StaffUI. The main UI class as shown in the diagram acts as the parent class with the other classes being its subclasses. Having a main UI class allows the program to have a common pool of methods so that each method is reusable in each functionality. Each individual function UI extends the main UI and consists of the methods that deals with users unique to their functionality. The UI component interacts with the Logic package and Instance package the most.
The UI component,
Executes user commands using the ‘Logic’ component.
Listens to changes to Instance data so that the UI can be updated with the modified data.
Is responsible for handling all input and output of the program.
4.3 Logic Component
The Logic component is responsible for the following tasks:
- Run instances of the various features within HealthVault.
- Converts user inputs into data that is usable by the HealthVault.
- Executes the Command based on interpreted data.
To accomplish the above, the Logic component, follows the following sequence of steps:
Interpreting user input:
The Instance component runs the main super loop to accept user input. It creates a Parser to interpret user inputs.
Checking User Input:
The Parser creates an ErrorChecker class and uses it to check the user input for any erroneous and unacceptable inputs.
Creating Command:
After checking the input, the Parser component then creates the Command that corresponds to the user input.
Executing Command:
With the interpreted Command from the Parser, the Instance component then executes the Command.
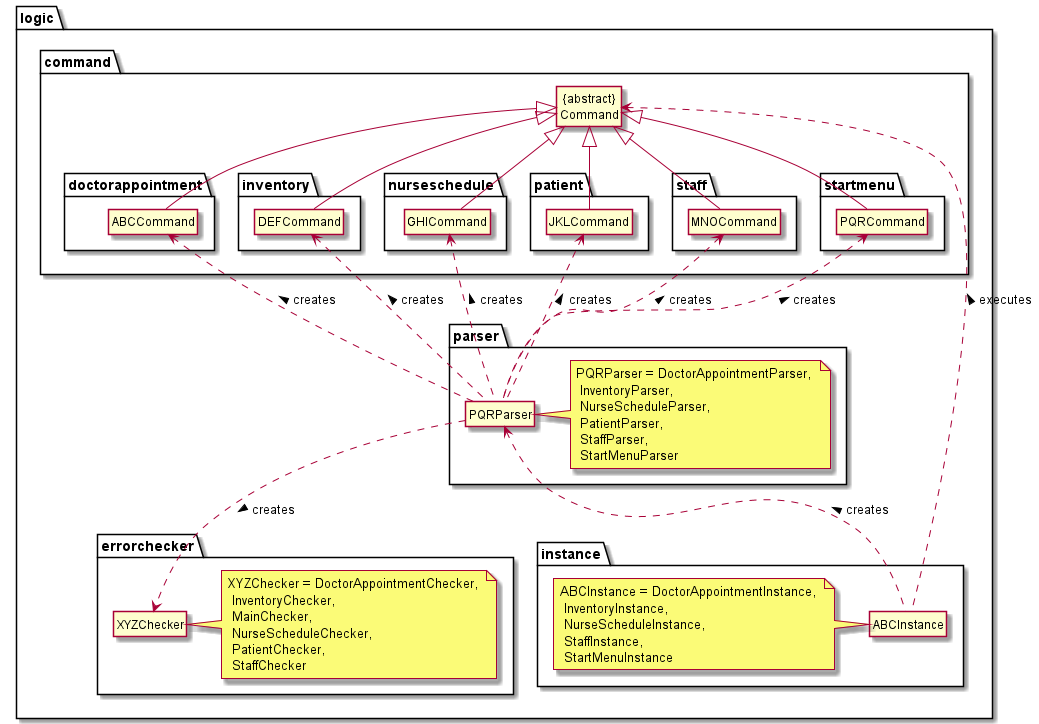
The following class diagram illustrates the interactions between various logic components
The following class diagram illustrates the group of Commands under the doctorappointment package. Due to the similar Commands in each of the Command packages, the information in the doctorappointment package should be representative of the other Command packages.
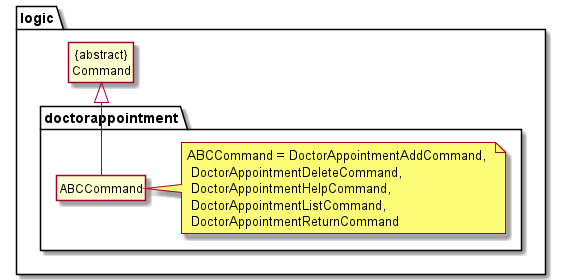
Similar classes are represented by abbreviations i.e. ABCCommand. The actual class names are written in the notes beside the classes.
- ABCInstance represents the different
Instanceclasses.- PQRParser represents the different
Parserclasses.- XYZChecker represents the different
ErrorCheckerclasses.- The “XXX”Command in each package under the
Commandpackage represent the different commands relating to each individual feature.
4.4 Model component
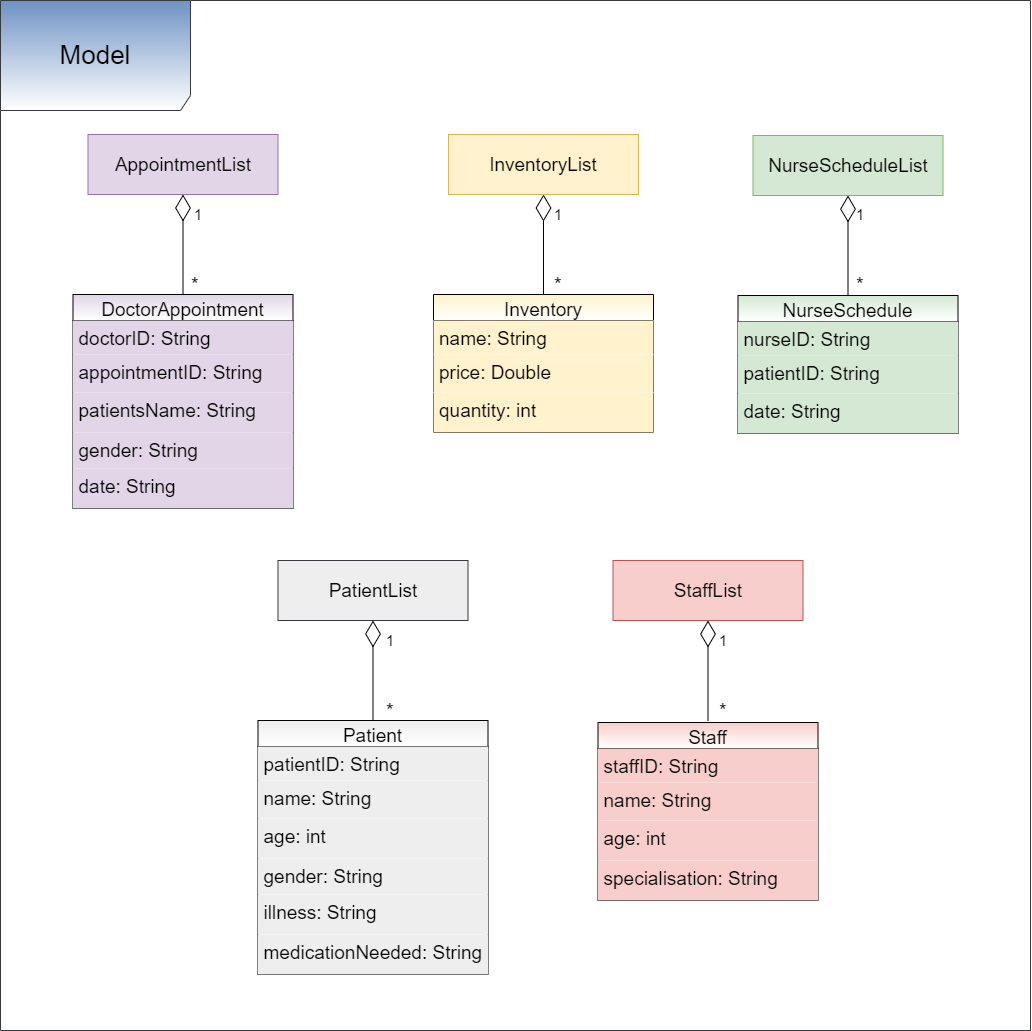
The Model component consists of classes that represents the collection of objects that a nurse has to interact with.
The Model, consists of 5 different types of arraylists.
- AppointmentList stores DoctorAppointment objects. AppointmentList also has methods needed to interact with objects in the arraylist.
- InventoryList stores Inventory objects. InventoryList also has methods needed to interact with objects in the arraylist.
- NurseScheduleList stores NurseSchedule objects. NurseScheduleList also has methods needed to interact with objects in the arraylist.
- PatientList stores Patient objects. PatientList also has methods needed to interact with objects in the arraylist.
- StaffList stores Staff objects. StaffList also has methods needed to interact with objects in the arraylist.
4.5 Storage component
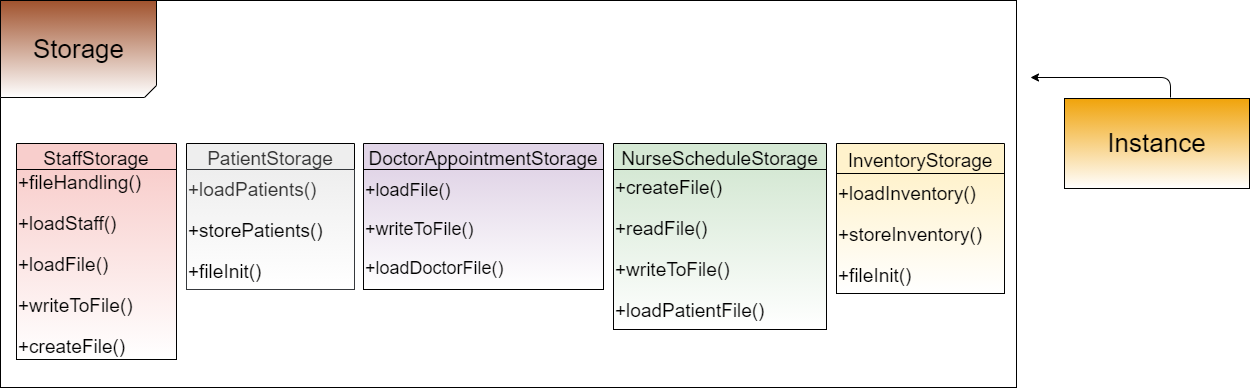
The Storage component consists of classes that individually reads data from, and writes data to, 5 different .txt files.
The Storage, consists of 5 different types of classes:
- DoctorAppointmentStorage implements
writeToFile()to write information regarding doctorID, name, date, appointmentID, and gender into DoctorAppointment.txt file.loadFile()loads the data in the DoctorAppointment.txt file into an array list to be returned.loadDoctorFile()loads the doctor information from the staff database. - InventoryStorage implements
storeInventory()to write information regarding item name, price, and quantity into Inventory.txt file.loadInventory()loads the data in the Inventory.txt file into an array list to be returned. - NurseScheduleStorage implements
writeToFile()to write information regarding nurseID, patientID, date into NurseSchedule.txt file.loadPatientFile()loads the patient information from the patient database. - StaffStorage implements
writeToFile()to write information regarding staffID, name, age, and specialisation into Staff.txt file.loadFile()loads the data in the Patients.txt file into an array list to be returned. - PatientStorage implements
storePatients()to write information regarding patientID, name, age, gender, illness, and itemsNeeded into Patient.txt file.loadPatients()loads the data in the Patient.txt file into an array list to be returned.
5. Implementation
In this section, we will introduce the implementation of the different functions within each feature.
5.1 Staff
5.1.1 Staff Menu
Similar to the Start Menu, the Staff Menu will repeatedly request user input until the return command is given.
Whenever a user input is given to the Staff Menu, the following steps will occur.
Launching Staff Menu
-
ToStaffInstance.execute()will create and callStaffInstance.run() -
StaffInstance.run()will start by loading/creating the Staff data .txt file for Staff database records. It will check for any signs of corrupted file when loading. An Exception will be thrown if any corruption occurs. -
StaffInstance.run()will then repeatedly callcommandHandler().
Getting User Input
-
StaffInstance.run()will repeatedly request for user input and callStaffParser.commandHandler(). -
commandHandler()will call thesmartCommandRecognition()to assess the given user input and determine which command is most similar to the input - Based on the recognised command by the system, the relevant commands will be carried out.
5.1.2 Staff Add
Implementation:
The function Add takes in 4 compulsory fields (Staff ID, Name, Age, Specialisation) to create the Staff Object and adds it to an collection of Staff Objects. Data input is first checked to ensure validity. Any invalid input detected will result in an Exception thrown and command aborted. A StaffAddCommand object is created. StaffAddCommand object will be executed to create the Staff Object which will be added to the collection of Staff Objects.
Invalid Input includes:
- Invalid Staff ID format
- Duplicated Staff ID
- Age that < 18 or > 150
- Blank input (i.e Empty inputs)
- Illegal Characters
Format add/[Staff ID]/[name]/[age]/[specialisation]
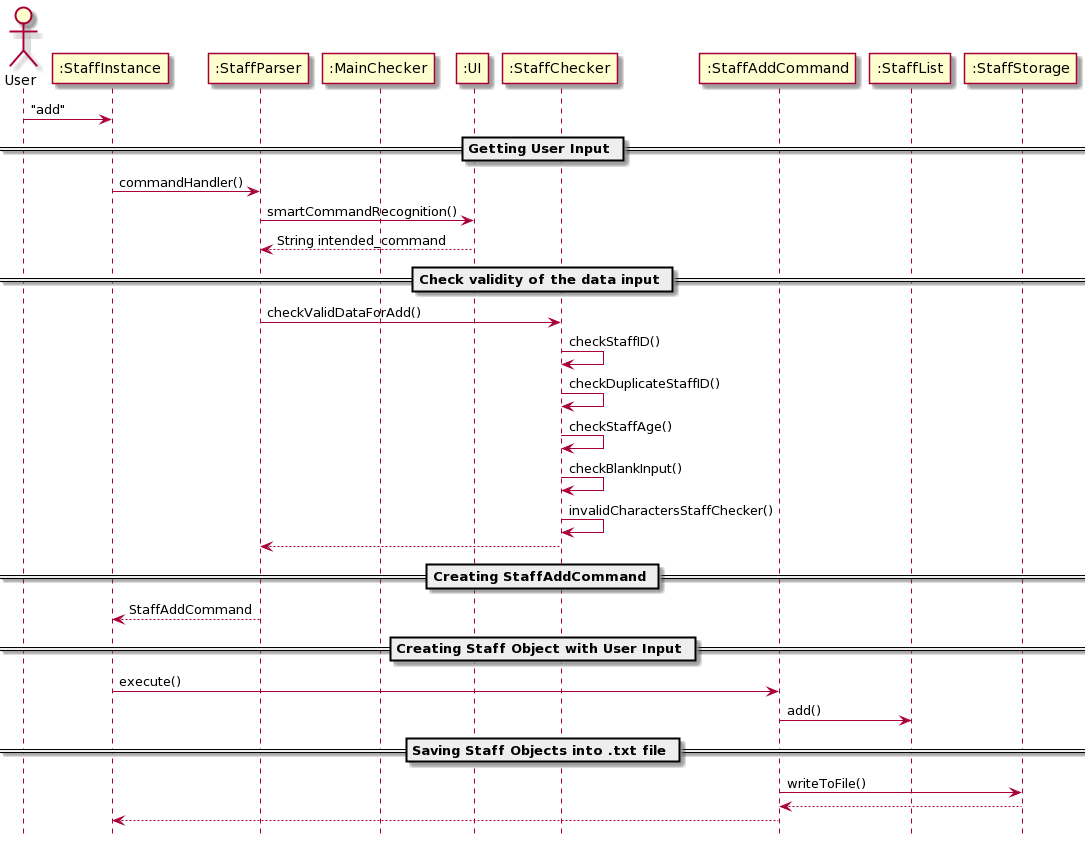
Check validity of the data input
- If the command recognised is the add command,
commandHandler()callsstaffChecker.checkValidDataForAdd()to ensure data entered is valid -
checkValidDataForAdd()will call the following function in sequence:- checkStaffID()
- checkDuplicateStaffID()
- checkStaffAge()
- checkBlankInput()
- invalidCharactersStaffChecker()
Creating StaffAddCommand object
- If the input data is valid, a StaffAddCommand object is created. Else a relevant error is thrown.
- The StaffAddCommand object is returned to
StaffInstance.run()
Creating Staff Object with User Input
-
StaffInstance then executes the StaffAddCommand object to begin the process of creating the Staff object
-
StaffAdd.execute()will call the functionStaffList.add() -
StaffList.add()will instantiate a new Staff object and add it to the ArrayListStaffList, which contains all the Staff Objects.
Saving Staff Objects into .txt file
-
StaffList.add()then callsStaffStorage.writeToFile()which starts the process of writing the details of all existing Staff Objects, within the StaffList into a specified .txt file. -
StaffStorage.writeToFile()then callscreateFile()which ensures that the specified .txt file exists. - Data is written and saved.
- Control is then returned to StaffInstance.
Design Considerations
Deciding the main data structure, ArrayList or Dictionary:
Option 1 (Final choice): Using an ArrayList
- Pros: Flexibility in accessing the information in Staff objects.
- Cons: Slow accessing of items when searching for information in ArrayList compared to Dictionary.
Option 2 : Using a Dictionary
- Pros: Able to utilise the key function of dictionary to locate items quickly.
- Cons: Multiple items to be stored for 1 single key in the dictionary.
- Cons: Listing all information might be rather troublesome.
5.1.3 Staff Delete
Implementation:
The function Delete takes in 1 compulsory field (Staff ID) to identify and delete the Staff Object from the collection of Staff Objects. Data input is first checked to ensure validity. Any invalid input detected will result in an Exception thrown and command aborted. After validation, a StaffDeleteCommand object is created. StaffDeleteCommand object will be executed to iterate through the collection of Staff Objects. If Staff Object exists, it will be removed. Else an error message will be displayed.
Invalid Input includes:
- Invalid Staff ID format
- Blank input (i.e Empty inputs)
- Illegal Characters
Format delete/Staff ID
Check validity of the data input
- If the command recognised is the delete command,
commandHandler()callsstaffChecker.checkDeleteCommand()to ensure that there are valid and sufficient inputs
Creating StaffDelete command
- If the input data is valid, a StaffDeleteCommand object is created
- The StaffDeleteCommand object is returned to
StaffInstance.run()
Deleting Staff Object using User Input
- StaffInstance then executes the StaffDeleteCommand object to begin the process of deleting the referenced Staff object
-
StaffDelete.execute()will call the functionStaffList.delete() -
StaffList.delete()will iterate through the objects in ArrayListStaffList. The Staff Object referenced by the input given by the user will be deleted.
Saving changed Staff Objects into .txt file
-
StaffList.delete()then calls StaffStorage.writeToFile() which starts the process of writing the changed details of Staff Objects, within the StaffList into a specified .txt file. -
StaffStorage.writeToFile()then callscreateFile()which ensures that the specified .txt file exists. - Data is written and saved.
- Control is then returned to StaffInstance.
Design Considerations
Deciding whether to use an iterator to iterate through the ArrayList.
Option 1 (Final choice): Not using an iterator
- Pros: Using the inbuilt commands to iterate through to find the item to delete seems more straightforward.
- Cons: The flexibility of the data manipulation may be restrictive and this may result in future functions being harder to implement.
Option 2 : Using an iterator
- Pros: An iterator allows for more flexible data access as it allows for more efficient deletion of a block of data, and it helps to keep the location of where data was manipulated.
- Cons: Maintenance of the iterator is very difficult, and it may not be worth the effort to implement when solutions exist that only require inbuilt functions.
5.1.4 Staff List
Implementation:
The function list takes in 1 optional field (nurses/doctors) to identify and list the category of Staff Objects required from the collection of Staff Objects. Data input is first checked to ensure validity. Any invalid input detected will result in an Exception thrown and command aborted. After validation, a StaffListCommand object is created. StaffListCommand object will be executed to iterate through the collection of Staff Objects. Staff Objects will then be displayed based on the user given input.
Invalid Input includes:
- Any input apart from Blank Input (i.e Empty input) OR "doctors" OR "nurses"
Format list/<doctors/nurses>
Check validity of the data input
- If the command recognised is the list command,
commandHandler()callsstaffChecker.checkListCommand()to check and verify the validity of inputs accompanied by the list command, if any.
Creating StaffList command
- If the input data is valid, a StaffListCommand object is created
- The StaffListCommand object is returned to
StaffInstance.run()
Viewing Staff Objects
- StaffInstance then executes the StaffListCommand object to begin the process of displaying all Staff objects.
-
StaffList.execute()will call the functionStaffList.list() -
StaffList.list()will iterate through the objects in ArrayListStaffList. - Depending on the input given by the user, the relevant Staff Objects will be displayed.
- Control is then returned to StaffInstance.
Design Considerations
Deciding whether to have additional capabilities for the list function:
Option 1 (Final choice): Function to list either nurses or doctors.
- Pros: Able to be specific to view specific data items.
- Cons: Implementation will be troublesome. Need to consider the fact that there is variable number of inputs (0/1).
Option 2 : Only have a general list function to see all staff information.
- Pros: Easy implementation.
- Cons: Unable to view just the nurses/doctors information.
5.1.5 Staff Find
Implementation:
The function Add takes in 1 compulsory field (keyword) to find the relevant Staff Objects within the collection of Staff Objects. Data input is first checked to ensure validity. Any invalid input detected will result in an Exception thrown and command aborted. The given input is used to match with every single field of the Staff Object. If there is a match, the Staff Object will be displayed. Else, an error message will be displayed.
Invalid Input includes:
- Blank input (i.e Empty inputs)
Format find/[keyword]
Check validity of the data input
- If the command recognised is the find command,
commandHandler()callsMainChecker.checkNumInput().MainChecker.checkNumInput()does a simple check to ensure there is an accompanying input given by the user together with the find command.
Creating StaffFind command
- If the input data exist, a StaffFindCommand object is created
- The StaffFindCommand object is returned to
StaffInstance.run()
Finding relevant Staff Objects
- StaffInstance then executes the StaffFindCommand object to begin the process of finding and displaying relevant Staff objects.
-
StaffFind.execute()will call the functionStaffList.find() -
StaffList.find()will iterate through the objects in ArrayListStaffList. -
StaffList.find()will utilise a search function in StaffList to find any Staff Objects that matches the given keyword by the user. - The relevant Staff Objects are then displayed.
- Control is then returned to StaffInstance.
Design Considerations
Deciding whether find function should be case-sensitive:
Option 1 (Final choice): Case-insensitive.
- Pros: Provides the user with greater flexibility when querying the list for specific data.
- Cons: Harder to implement and may result in unwanted data being shown.
Option 2 : Case sensitive.
- Pros: Easy to implement and can be more specific.
- Cons: Harder to consistently type and very punishing for users who don’t know if what they are searching for has capital letters.
5.2 Patient
5.2.1 Patient Menu
The Patient Menu will repeatedly request user input until the return command is given.
Whenever a user input is given to the Patient Menu, the following steps will occur.
Launching Patient Menu
-
ToPatientInstance.execute()will create and callPatientInstance.run() -
PatientInstance.run()will start by loading/creating the Patient data .txt file for Patient database records. It will check for any signs of corrupted file when loading and exception will be thrown if any corruption is detected. -
PatientInstance.run()will then enter its running for loop and repeatedly take in user inputs for data processing.
Getting User Input
-
PatientInstance.run()will repeatedly request for user input and callPatientParser.patientParse(). -
patientParse()will call thesmartCommandRecognition()to assess the given user input and determine which command is most similar to the input. - The most relevant command is then returned to the parser, and the parser then scans the input thoroughly based on the command returned. Relevant errors in the input are detected and the appropriate exceptions thrown.
- Only after scanning the input for errors, will the proper command be returned to
PatientInstancewhere it will then be executed. - After getting an input, and parsing it into string tokens, a new instance of PatientChecker class
checkeris instantiated to perform error checking.
5.2.2 Patient Add
Implementation:
The function Add takes in 6 compulsory fields (Patient ID, Name, Age, Gender, Illness and Medication Required) to create the Patient Object and adds it to a list of Patient Objects. Data input is first checked to ensure validity. Any invalid input detected will result in an exception thrown and command aborted. If there are no exceptions thrown, a PatientAddCommand object is created. The PatientAddCommand object will be executed to create the Patient Object which will be added to the list of Patient Objects.
Invalid Input includes:
- Invalid Patient ID format
- Duplicated Patient ID
- Age that < 0 or > 150
- Invalid Gender Input
- Blank input (i.e Empty inputs)
- Inputs that only consist of spaces
- Illegal Characters
Format
add/[Patient ID]/[name]/[age]/[gender]/[illness]/[medication required]
Check validity of the data input
- If the command recognised is the add command,
patientParse()callschecker.checkAdd()to ensure data entered is valid. -
checkAdd()will call the following methods in sequence:- emptySpaceCheck();
- checkLength();
- checkID();
- checkAge();
- illegalCharacterChecker();
- checkGender();
Creating PatientAddCommand
- If the input data is valid, a PatientAddCommand object is created. Else a relevant error is thrown.
- The PatientAddCommand object is returned to
PatientInstance.run()
Creating Patient Object with User Input
-
PatientInstance then executes the PatientAddCommand object to begin the process of creating the Patient object
-
PatientAdd.execute()will call the function inPatientList.add() -
PatientList.add()will instantiate a new Patient object and add it to the ArrayListPatientList, which contains all the Patient Objects.
Saving Patient Objects into .txt file
- PatientInstance then calls
PatientStorage.storePatients()which starts the process of writing the details of all existing Patient Objects, within the PatientList into a specified .txt file. -
PatientStorage.storePatients()then callsfileInit()which ensures that the specified .txt file exists. - Data is written and saved.
- Control is then returned to PatientInstance.
Design Considerations
Using an ArrayList over a List as the main data structure:
Option 1 (Final choice): Using an ArrayList
- Pros: Able to access a patient given the index and allows for more flexibility in the methods used.
- Cons: Slow accessing when storing and loading as an ArrayList takes more resources than a List.
Option 2 : Using a List
- Pros: Able to load and store very fast and also able to perform functions like “list” fast.
- Cons: No random access and thus made certain functions more troublesome code wise.
5.2.3 Patient Delete
Implementation:
The function Delete takes in 1 compulsory field (Patient ID) to identify and delete the Patient Object from the list of Patient Objects. Data input is first checked to ensure validity. Any invalid input detected will result in an Exception thrown and command aborted. After validation, a PatientDeleteCommand object is created. The PatientDeleteCommand object will be executed to iterate through the list of Patient Objects. If Patient Object exists, it will be removed. Else an error message will be displayed.
Invalid Input includes:
- Invalid Patient ID format
- Blank input (i.e Empty inputs)
- Inputs that only consist of spaces
Format
delete/[Patient ID]
Check validity of the data input
- If the command recognised is the delete command,
patientParse()callschecker.checkLength()andchecker.checkID()to ensure data entered is valid.
Creating PatientDeleteCommand
- If the input data is valid, a PatientDeleteCommand object is created
- The PatientDeleteCommand object is returned to
PatientInstance.run()
Deleting Patient Object using User Input
- PatientInstance then executes the PatientDeleteCommand object to begin the process of deleting the referenced Patient object
-
PatientDelete.execute()will call the functionPatientList.deletePatient() -
PatientList.deletePatient()will iterate through the objects in ArrayListPatientList. The Patient Object referenced by the input given by the user will be deleted.
Saving changed Patient Objects into .txt file
- PatientInstance then calls
PatientStorage.storePatients()which starts the process of writing the details of all existing Patient Objects, within the PatientList into a specified .txt file. -
PatientStorage.storePatients()then callsfileInit()which ensures that the specified .txt file exists. - Data is written and saved.
- Control is then returned to PatientInstance.
Design Considerations
Using an iterator to store the location of the item being deleted:
Option 1 (Final choice): Not using an iterator
- Pros: Using the inbuilt commands to iterate through to find the item to delete seems more straightforward.
- Cons: The flexibility of the data manipulation may be restrictive and this may result in future functions being harder to implement.
Option 2 : Using an iterator
- Pros: An iterator allows for more flexible data access as it allows for more efficient deletion of a block of data, and it helps to keep the location of where data was manipulated.
- Cons: Maintenance of the iterator is very difficult, and it may not be worth the effort to implement when solutions exist that only require inbuilt functions.
5.2.4 Patient List
Implementation:
The function List does not take in any additional inputs, in order to show the user a list of current Patient objects in the database. Data input is first checked to ensure validity. Any invalid input detected will result in an Exception thrown and command aborted. After validation, a PatientListCommand object is created. PatientListCommand object will be executed to iterate through the list of Patient Objects. Patient Objects will then be displayed based on the user given input.
Invalid Input includes:
- Any input apart from Blank Input or a single delimiting slash.
Format
list
Check validity of the data input
- If the command recognised is the list command,
patientParse()callschecker.checkLength()to ensure data entered is valid.
Creating PatientListCommand
- If the input data is valid, a PatientListCommand object is created
- The PatientListCommand object is returned to
PatientInstance.run()
Viewing Patient Objects
- PatientInstance then executes the PatientListCommand object to begin the process of displaying all Patient objects.
-
PatientList.execute()will call the functionPatientList.listPatients() -
PatientList.listPatients()will iterate through the objects in ArrayListPatientList. - Patient Objects will be displayed.
- Control is then returned to PatientInstance.
Design Considerations
Using pretty print to display the listed objects:
Option 1 (Final choice): Using pretty print
- Pros: Visually appealing and neatly puts patients in rows with columns to display attributes. Better for larger lists.
- Cons: Harder to implement and sometimes causes visual errors when the names or display text become too large.
Option 2 : Printing the patients in blocks with no common rows or columns.
- Pros: Easy to implement and may be easier to show a single patient.
- Cons: Very difficult to view when the list of patients became increasingly large.
5.2.5 Patient Find
Implementation:
The function Find takes in 1 compulsory field (keyword) to find the relevant Patient Objects within the list of Patient Objects. Data input is first checked to ensure validity. Any invalid input detected will result in an Exception thrown and command aborted. The given input is used to match with every single field of the Patient Object. If there is a match, the Patient Object will be displayed. Else, an error message will be displayed.
Invalid Input includes:
- Blank input (i.e Empty inputs)
- Illegal Characters
- Inputs that only consist of spaces
Format
find/[keyword]
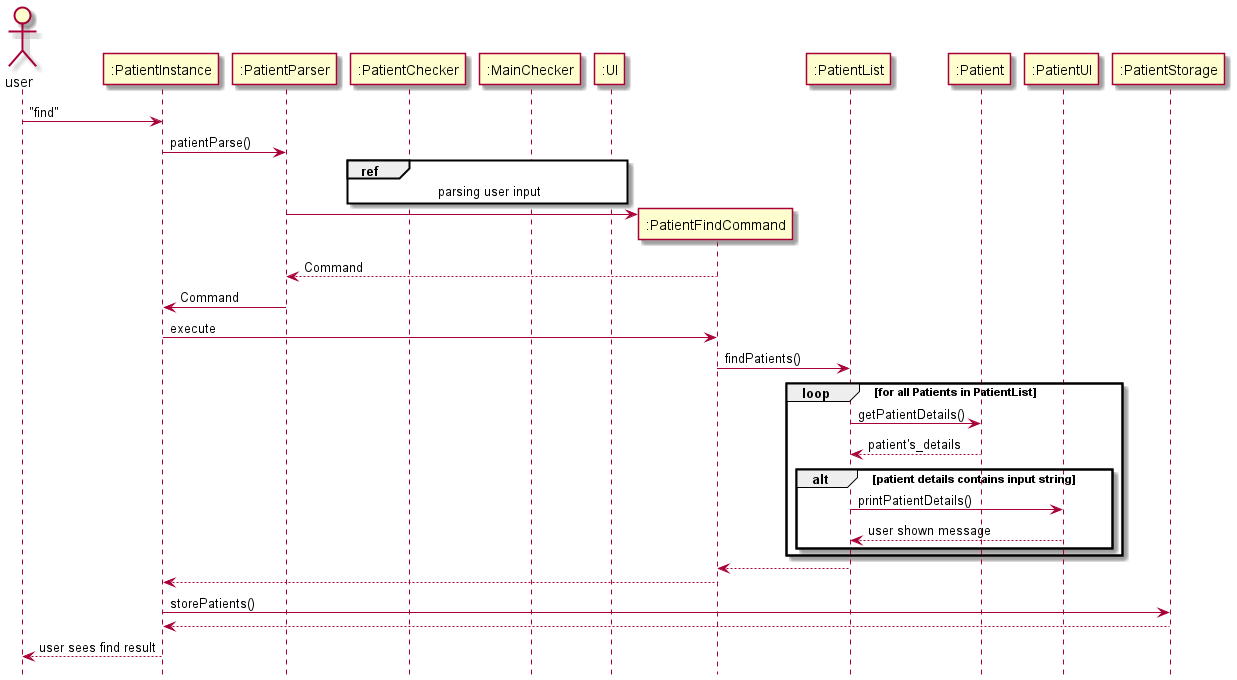
sub-diagram to show the ref
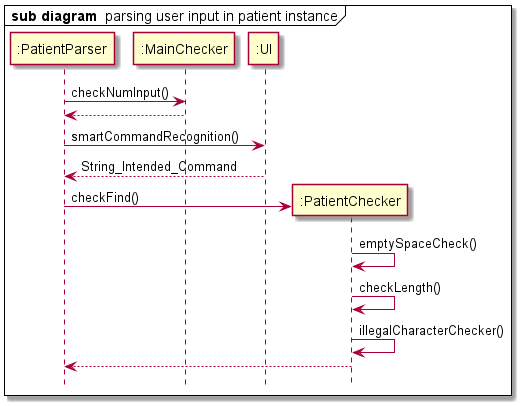
Check validity of the data input
- If the command recognised is the find command,
patientParse()callschecker.checkFind()to ensure data entered is valid. -
checkFind()will call the following methods in sequence:- emptySpaceCheck();
- checkLength();
- illegalCharacterChecker();
- emptySpaceCheck();
Creating PatientFindCommand
- If the input data exist, a PatientFindCommand object is created
- The PatientFindCommand object is returned to
PatientInstance.run()
Finding relevant Patient Objects
- PatientInstance then executes the PatientFindCommand object to begin the process of finding and displaying relevant Patient objects.
-
PatientFind.execute()will call the functionPatientList.findPatient() -
PatientList.findPatient()will iterate through the objects in ArrayListPatientList. -
PatientList.findPatient()will compare the patient details of every Patient Object in the current list of Patient Objects with the keyword inputted by the user and discover any matches. - The relevant Patient Objects are then displayed.
- Control is then returned to PatientInstance.
Design Considerations
Allowing find function to accept case-insensitive inputs:
Option 1 (Final choice): Allowing case-insensitive inputs.
- Pros: Provides the user with greater flexibility when querying the list for specific data.
- Cons: Harder to implement and may result in unwanted data being shown.
Option 2 : Only allowing case-sensitive inputs.
- Pros: Easy to implement and can be more specific.
- Cons: Harder to consistently type and very punishing for users who don’t know if what they are searching for has capital letters.
5.3 Doctor Appointment
5.3.1 Doctor Appointment Menu
Similar to the Start Menu, the Doctor Appointment Menu will repeatedly request user input until the return command is given.
Whenever a user input is given to the Doctor Appointment Menu, the following steps will occur.
Launching Doctor Appointment Menu
-
ToDoctorAppointmentInstance.execute()will be created and call uponDoctorAppointmentInstance.run(). -
DoctorAppointmentInstance.run()will start by loading/creating the DoctorAppointment data .txt file for database records. It will check for any signs of corrupted file when loading. Exception will be thrown if any corruption occurs. -
DoctorAppointmentInstance.run()will then repeatedly callDoctorAppointmentParser.parse().
Getting User Input
-
DoctorAppointmentInstance.run()will repeatedly request for user input and callDoctorAppointmentParser.parse(). -
parse()will call thesmartCommandRecognition()to assess the given user input and determine which command is most similar to the input. - Based on the recognised command by the system, the relevant commands will be carried out.
5.3.2 Doctor Appointment Add
Implementation:
The function Add takes in 5 compulsory fields (Doctor ID, Appointment ID, Patient’s Name, Gender, Date) to create the DoctorAppointment Object to be added. Data input is first checked to ensure validity. Any invalid input detected will result in an Exception thrown and command aborted. A DoctorAppointmentAddCommand object is created and executed to create the DoctorAppointment Object to be added.
Invalid Input includes:
- Invalid Doctor ID format
- Non-existent Doctor ID
- Invalid Appointment ID format
- Duplicated Appointment ID
- Illegal Characters for Names
- Invalid Gender format
- Invalid Date format
- Blank input (i.e Empty inputs)
add/[Doctor ID]/[Appointment ID]/[Patient's Name]/[Gender]/[Date]
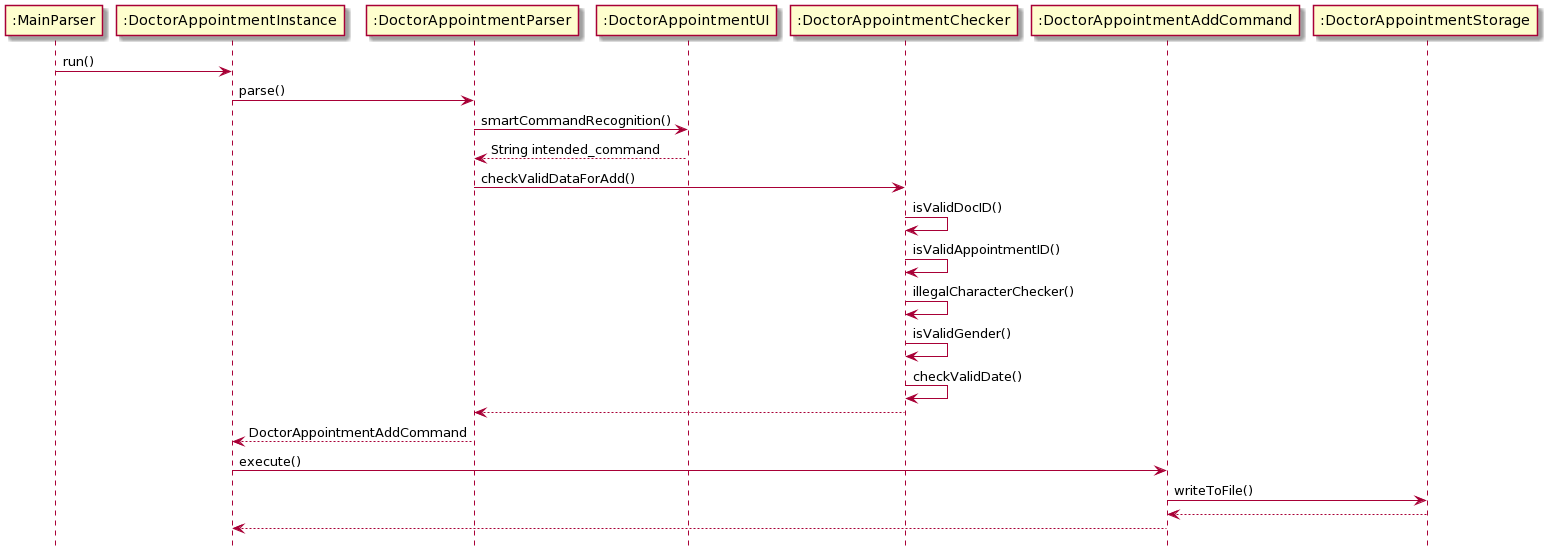
Check validity of the data input
- If the command recognised is the add command,
DoctorAppointmentParser.parse()callsMainChecker.checkNumInput()andDoctorAppointmentChecker.checkValidDataForAdd()to ensure data entered is valid. -
checkValidDataForAdd()will call the following function in sequence:- checkDoctorIDFormat()
- isValidDocId()
- checkAptIdFormat()
- isValidAppointmentID()
- illegalCharacterChecker()
- isValidGender()
- checkValidDate();
Creating DoctorAppointmentAddCommand
- If the input data is valid, a DoctorAppointmentCommand object is created. Otherwise, a relevant error will be thrown.
- The Command object is returned to
DoctorAppointmentInstance.run()
Creating DoctorAppointment Object with User Input
- DoctorAppointmentInstance then executes the DoctorAppointmentAddCommand object by running
DoctorAppointmentAddCommand.execute(). -
AppointmentList.addAppointment()will be called in which a DoctorAppointment object will be created and added into the ArrayListappointmentList, which contains all the DoctorAppointment Objects.
Saving DoctorAppointment Objects into .txt file
-
AppointmentList.addAppointment()then callsDoctorAppointmentStorage.writeToFile()which all existing DoctorAppointment Objects within the appointmentList is written into a DoctorAppointment.txt file. -
DoctorAppointmentStorage.writeToFile()then callscreateFile()which ensures that the specified .txt file exists. - Control is then returned to DoctorAppointmentInstance.
5.3.3 Doctor Appointment Delete
Implementation:
The delete function takes in 1 compulsory field (Doctor ID/ Appointment ID) to identify and delete the corresponding DoctorAppointment Object from ArrayList
Invalid Input includes:
- Invalid Doctor ID format
- Non-existent Doctor ID
- Invalid Appointment ID format
- Non-existent Appointment ID
- Blank input (i.e Empty inputs)
delete/[Doctor ID/ Appointment ID]
Check validity of the data input
-
If the command is recognised as the delete command,
DoctorAppointmentParser.parse()callsMainChecker.checkNumInput()andDoctorAppointmentChecker.checkValidDataForDelete()to ensure that the inputs are valid. -
checkValidDataForDelete()will call the following function in sequence:- checkIdDuringParse()
- isValidIdToDelete()
Creating DoctorAppointmentDeleteCommand
- A DoctorAppointmentDeleteCommand object is created if the inputs are valid.
- The Command object is returned to
DoctorAppointmentInstance.run().
Deleting DoctorAppointment Object using User Input
- DoctorAppointmentInstance then executes the DoctorAppointmentDeleteCommand object by running
DoctorAppointmentDeleteCommand.execute(). -
AppointmentList.deleteAppointment()is called, which iterates through the objects in ArrayListappointmentList. The DoctorAppointment Object matching the input given by the user will be removed from the array list.
Saving changed DoctorAppointment Objects into .txt file
-
AppointmentList.deleteAppointment()then callsDoctorAppointmentStorage.writeToFile()which rewrites the updated appointmentList into the DoctorAppointment.txt file. - Control is then returned to DoctorAppointmentInstance.
5.3.4 Doctor Appointment List all
Implementation:
The function lists all Doctor Appointment Objects currently in ArrayList
Invalid Input includes:
- Any input apart from Blank Input (i.e Empty input) OR "all" OR "Appointment ID" OR "Doctor ID"
list/all
Check validity of the data input
-
If the command recognised is the list command,
DoctorAppointmentParser.parse()callsMainChecker.checkNumInput()andDoctorAppointmentChecker.checkValidDataForList()to check and verify the validity of inputs accompanied by the list command, if any. -
checkValidDataForList()will call the following function in sequence:- checkIdDuringParse()
- isValidDocId()
- isValidListAppointmentID()
Creating DoctorAppointmentListCommand
- A DoctorAppointmentListCommand object is created if the inputs are valid.
- The Command object is returned to
DoctorAppointmentInstance.run().
Viewing DoctorAppointment Objects
- DoctorAppointmentInstance then executes the DoctorAppointmentList Command object by running
DoctorAppointmentListCommand.execute(). -
AppointmentList.listAppointment()is called, and will iterate through the objects in ArrayListappointmentList. - All DoctorAppointment Objects in the array list will be displayed.
- Control is then returned to DoctorAppointmentInstance.
5.3.5 Doctor Appointment List by Doctor ID or Appointment ID
Implementation:
The function list takes in 1 compulsory field (keyword) to list the relevant DoctorAppointment Objects currently in ArrayList
- Any input apart from Blank Input (i.e Empty input) OR "all" OR "Appointment ID" OR "Doctor ID"
list/[Doctor ID/ Appointment ID]
Check validity of the data input
- If the command recognised is the list command,
DoctorAppointmentParser.parse()callsMainChecker.checkNumInput()andDoctorAppointmentChecker.checkValidDataForList()to check and verify the validity of inputs accompanied by the list command, if any.
Creating DoctorAppointmentListCommand
- A DoctorAppointmentListCommand object is created if the inputs are valid.
- The Command object is returned to
DoctorAppointmentInstance.run().
Viewing DoctorAppointment Objects
- DoctorAppointmentInstance then executes the DoctorAppointmentListCommand object by running
DoctorAppointmentListCommand.execute(). -
AppointmentList.listAppointment()is called, and will iterate through the objects in ArrayListappointmentList. - DoctorAppointment Objects matching the user input present in the array list will be displayed.
- Control is then returned to DoctorAppointmentInstance.
5.4 Nurse Schedule
5.4.1 Nurse Schedule Menu
Similar to the start menu, the Nurse Schedule menu will repeatedly request user input until the return command is given.
Whenever a user input is given to the Nurse Schedule Menu, the following steps will occur
Launching Nurse Schedule Menu
-
ToNurseScheduleInstance.execute()will create and callNurseScheduleInstance.runCommandLoopUntilExit(). -
runCommandLoopUntilExit()will start by loading/creating the NurseSchedule.txt for database records. It will check for any signs of file corruption when loading. An exception will be thrown if any corruption is present. -
runCommandLoopUntilExit()will then repeatedly call nurseParse().
Getting User Input
-
User inputs are repeatedly requested by
runCommandLoopUntilExit. -
nurseParse()will callsmartCommandRecognitionto assess the given user input and determine which command is the most similar to the input. -
Based on the recognised command, the relevant execution will be carried out.
5.4.2 Nurse Schedule Add
Implementation
The function Add takes in 3 compulsory fields (Nurse ID, Patient ID, Date) to create a new Nurse Schedule object to be added. The Nurse ID, Patient ID and Date inputs will be first checked to ensure validity. Any invalid input detected will result in an Exception thrown and command will be aborted. Else, a NurseScheduleAddCommand object is created and executed which will create a NurseSchedule object to be added.
Invalid Inputs include:
- Invalid Nurse ID or Patient ID format
- Non-existent Nurse ID or Patient ID
- Blank input
- Illegal Characters
- Illegal date format
- Duplicate schedules (i.e similar Patient ID and date)
Format: add/[Nurse ID]/[Date (DDMMYYYY)]
Checking validity of data input
- If the command recognised is the add command, the parameters will first be checked for their validity. The following functions will be called in sequence:
- isValidDate()
- checkNumInput()
- illegalCharacterChecker()
Creating NurseScheduleAddCommand object with User Input
-
If the parameters are valid, a NurseScheduleAddCommand object is created, which will be passed back to
NurseScheduleInstance.runCommandLoopUntilExit(). -
The Command objected is then executed and
NurseScheduleList.addSchedule()will be called which creates a NurseSchedule object and adds it into the array list.
Saving NurseSchedule objects into .txt file
-
The command loop then calls
NurseScheduleStorage.writeToFile()which starts the process of writing details of all existing Nurse Schedule objects within the Arraylist into a specific .txt file. -
Control is then returned to NurseScheduleInstance.
5.4.3 Nurse Schedule Delete
Implementation
The delete function takes in 2 compulsory field (Nurse ID, Date) to identify and delete the Nurse Schedule object from the arraylist of Nurse Schedule objects. The Nurse ID and date will first be checked for its validity. Any invalid input detected will result in an exception thrown and command will be aborted. Else, a NurseScheduleDeleteCommand object is created and executed.
Invalid Inputs include:
- Invalid Nurse ID format
- Non-existent Nurse ID
- Blank input
- Illegal Characters
- Illegal date format
Format: delete/[Nurse ID]/[Date (DDMMYYYY)]
Checking validity of data input
- If the command is recognised as a delete command, the parameters provided will first be checked for its validity.
Creating NurseScheduleDeleteCommand object
-
If the parameters are valid, a NurseScheduleDeleteCommand object is created, which will be passed back to
NurseScheduleInstance.runCommandLoopUntilExit(). -
NurseScheduleDelete.execute()will call the functionNurseScheduleList.deleteSchedule(). -
deleteScheduleiterates through the arraylist and removes the first object that matches the user input given.
Saving updated NurseSchedule objects into .txt file
-
runCommandLoopUntilExit()will then callNurseScheduleStorage.writeToFile()which starts the process of writing details of all existing Nurse Schedule objects within the Arraylist into a specific .txt file. -
Control is then returned to NurseScheduleInstance.
5.4.4 Nurse Schedule List all
Implementation
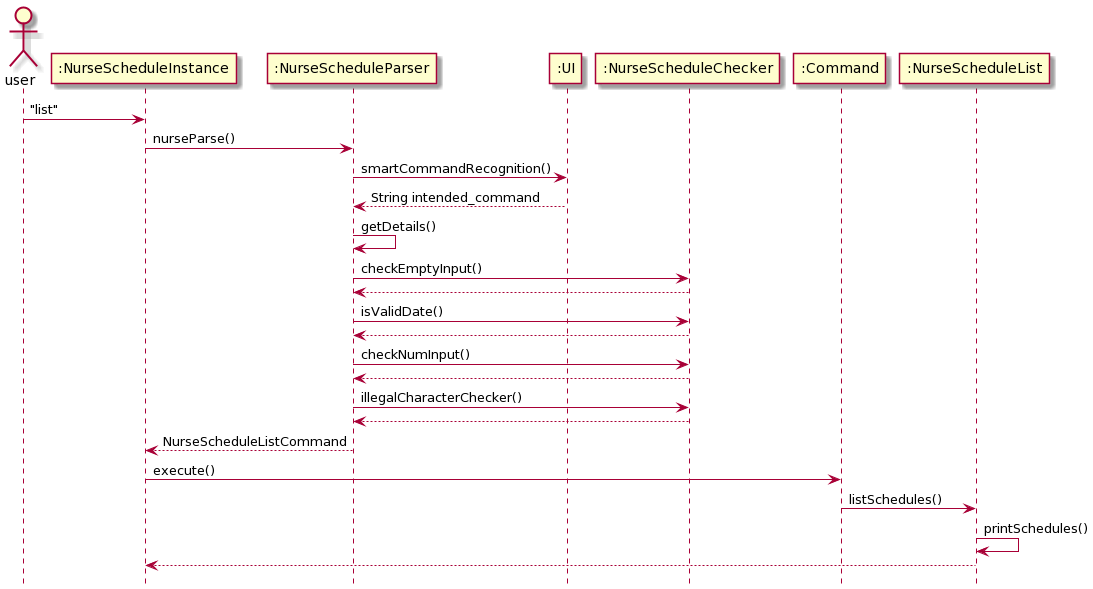
This function lists all Nurse Schedule objects, sorted by earliest added Nurse ID, then sorted by earliest date. Data input is first checked to ensure validity. Any invalid input detected will result in an Exception thrown and command aborted. After validation, a NurseScheduleListCommand object is created. NurseScheduleListCommand object will be executed to iterate through the arraylist of Nurse Schedule objects. Nurse Schedule Objects will then be displayed.
Invalid Inputs include:
- Any input apart from "all" OR "NurseID"
Format: list/all
Checking validity of data input
- If the command recognised is the list command, the number of fields in inputs will first be checked.
Creating NurseScheduleListCommand object
-
If the input is valid, a NurseScheduleListCommand object is created.
-
The NurseScheduleListCommand object is returned to
NurseScheduleInstance.runCommandLoopUntilExit().
Viewing Nurse Schedule objects
-
NurseScheduleInstance then executes the NurseScheduleListCommand object to begin the process of displaying Nurse Schedule objects.
-
NurseScheduleListCommand.execute()will call the functionNurseScheduleList.listSchedules()which callslistAllSchedules(). -
listAllSchedules()iterates through the arraylist of Nurse Schedule objects, printing all schedules.
5.4.5 Nurse Schedule List by Nurse ID
Implementation
This function lists specified Nurse Schedule objects, sorted by earliest date. Data input is first checked to ensure validity. Any invalid input detected will result in an Exception thrown and command aborted. After validation, a NurseScheduleListCommand object is created. NurseScheduleListCommand object will be executed to iterate through the arraylist of Nurse Schedule objects. Nurse Schedule objects will then be displayed.
Invalid Inputs include:
- Any input apart from "all" OR "NurseID"
Format: list/[Nurse ID]
Checking validity of data input
- If the command recognised is the list command, the number of fields in inputs will first be checked.
Creating NurseScheduleListCommand object
-
If the input is valid, a NurseScheduleListCommand object is created.
-
The NurseScheduleListCommand object is returned to
NurseScheduleInstance.runCommandLoopUntilExit().
Viewing Nurse Schedule objects
-
NurseScheduleInstance then executes the NurseScheduleListCommand object to begin the process of displaying Nurse Schedule objects.
-
NurseScheduleListCommand.execute()will call the functionNurseScheduleList.listSchedules()which callsgetSchedulesByID. -
getSchedulesByIDiterates through the arraylist of Nurse Schedule objects, printing schedules of the relevant Nurse ID.
5.5 Inventory
5.5.1 Inventory Menu
Similar to the Start Menu, the Inventory Menu will repeatedly request user input until the return command is given.
Whenever a user input is given to the Inventory Menu, the following steps will occur.
Launching Inventory Menu
-
ToInventoryInstance.execute()will create and callInventoryInstance.run() -
InventoryInstance.run()will start by loading/creating the Inventory data .txt file for Inventory database records. It will check for any signs of corrupted file when loading. Exception will be thrown if any corruption occurs. -
InventoryInstance.run()will then repeatedly callInventoryParser().
Getting User Input
-
InventoryInstance.run()will repeatedly request for user input and callInventoryParser.inventoryParse(). -
inventoryParse()will call thesmartCommandRecognition()to assess the given user input and determine which command is most similar to the input - Based on the recognised command by the system, the relevant commands will be carried out.
5.5.2 Inventory Add
Implementation:
The function Add takes in 3 compulsory fields (Item Name, Price, Quantity) to create the Inventory Object to be added. Data input is first checked to ensure validity. Any invalid input detected will result in an Exception thrown and command aborted. A InventoryAdd Command object is created. InventoryAdd command object will be executed to create the Inventory Object to be added.
Invalid Input includes:
- Invalid Price
- Invalid Quantity
- Blank input (i.e Empty inputs)
- Illegal Characters
add/[Item Name]/[Price]/[Quantity]
Check validity of the data input
- If the command recognised is the add command,
InventoryParser.parse()callsInventoryChecker.checkAdd(),MainChecker.checkNumInput(), andMainChecker.checkBlankInput()to ensure data entered is valid -
checkAdd()will call the following function in sequence:- emptySpaceCheck()
- checkStorageLength()
- illegalCharacterChecker()
- checkPrice()
- checkQuantity()
- checkDuplicate()
Creating InventoryAdd command
- If the input data is valid, a InventoryAdd Command object is created. Otherwise, a relevant error is thrown.
- The InventoryAdd Command object is returned to
InventoryInstance.run()
Creating Inventory Object with User Input
-
InventoryInstance then executes the InventoryAdd Command object by running
InventoryAdd.execute(). -
InventoryList.addItems()will be called in which an Inventory object will be created and added into the ArrayListinventoryList which contains all the Inventory Objects. -
If the list already contains data with the same Item Name and Price, the Quantity of the Item will be increased in the list by the value in the user input Quantity field.
InventoryList.addItemswill callInventory.addQuantity. This will modify the Quantity of that specified Item.
Saving Inventory Objects into .txt file
-
InventoryInstancethen callsInventoryStorage.storeInventory()which starts the process of writing the details of all existing Inventory Objects, within the InventoryList into a specified .txt file. -
InventoryStorage.writeToFile()then callsfileInit()which ensures that the specified .txt file exists. - Data is written and saved.
- Control is then returned to InventoryInstance.
5.5.3 Inventory Delete
Implementation:
The function Delete takes in 2 compulsory field (Item Name, Quantity) to identify and decrease the Quantity of the Inventory Object from ArrayList
Invalid Input includes:
- Invalid Quantity
- Invalid Name
- Blank input (i.e Empty inputs)
- Illegal Characters
delete/Item Name/Quantity
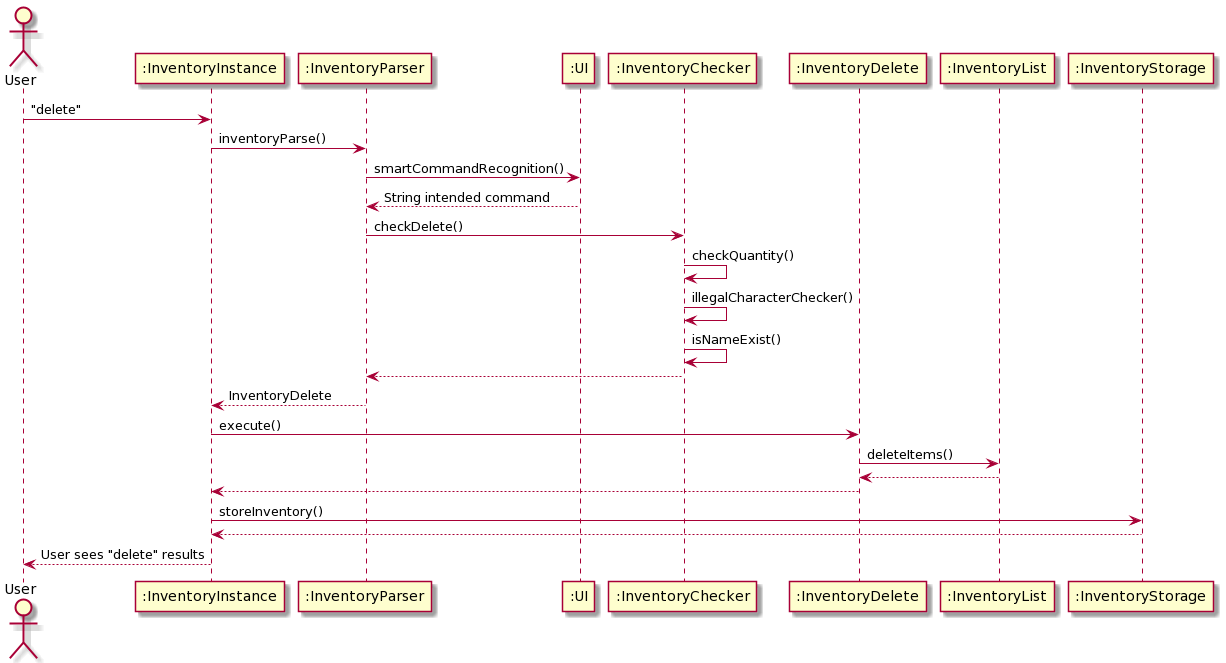
Check validity of the data input
- If the command recognised is the delete command,
InventoryParser.parse()callsInventoryChecker.checkDelete(),MainChecker.checkNumInput(), andMainChecker.checkBlankInput()to ensure that there are valid and sufficient inputs
Creating InventoryDelete command
- If the input data is valid, a InventoryDelete Command object is created
- The Command object is returned to
InventoryInstance.run()
Deleting Quantity from an Inventory Object using User Input
- InventoryInstance then executes the InventoryDelete Command object to begin the process of deleting the referenced Quantity of the Inventory object
-
InventoryList.deleteItems()is called, which iterate through the objects in ArrayListInventoryList. The Inventory Object referenced by the input given by the user, will have its Quantity reduced by the Quantity indicated in the user input.
Saving changed Inventory Objects into .txt file
-
InventoryInstancethen callsInventoryStorage.storeInventory()which starts the process of writing the details of all existing Inventory Objects, within the InventoryList into a specified .txt file. -
InventoryStorage.writeToFile()then callsfileInit()which ensures that the specified .txt file exists. - Data is written and saved.
- Control is then returned to InventoryInstance.
5.5.4 Inventory List
Implementation:
This function lists all the Inventories currently in the ArrayList
Check validity of the data input
- If the command recognised is the list command,
InventoryParser.parse()callsMainChecker.checkNumInput()to check and verify the validity of inputs accompanied by the list command, if any.
Creating InventoryList command
- If the input data is valid, a InventoryList Command object is created
- The InventoryList Command object is returned to
InventoryInstance.run()
Viewing Inventory Objects
- InventoryInstance then executes the InventoryList Command object to begin the process of displaying all Inventory objects.
-
InventoryList.execute()will callInventoryList.listInventory()and will iterate through the objects in ArrayListInventoryList. - Depending on the input given by the user, the relevant Inventory Objects will be displayed.
- Control is then returned to InventoryInstance.
5.6 Proposed Features
5.6.1 Auto Schedule Generator for Nurses
This feature will be able to generate the daily schedule for individual nurses with the schedules in the database. This will allow nurses to have a clear view of their daily tasks, allowing them to plan their day better. Hence, this feature has been proposed as one of the goals of HealthVault is to improve the efficiency of hospital and healthcare information management, something we believe this feature will do.
Brief Implementation
- User specifies which Nurse ID a schedule should be generated for.
- Program will sort all schedules tied to specified Nurse ID.
- A schedule will be generated based on the earliest schedule.
5.6.2 Personalized Account Login
This feature will allow nurses to have a personalized account within HealthVault, enabling them to only access relevant functionalities of the app. By cutting down on the unnecessary information one has to deal with, the team believes this will aid nurses working in a high-stress environment.
5.6.3 Inventory Alerts
This feature will alert nurses whenever an inventory of an item is low. This ensures that essential items will never be unavailable as nurses will always have up to date information on which specific item needs to be restocked.
Brief Implementation
- User adds a threshold stock quantity for when an alert should be raised.
- Program checks inventory database everytime inventory is accessed.
- Alert will be raised, reminding the nurses that the item is low on inventory level.
Appendix A: Product Scope
Target user profile:
HealthVault primarily targets nurses. Its features optimize it for users seeking:
- Efficiency in recording down new details relating to critical healthcare services like nurse schedules and doctors appointments.
- A cohesive database that records the critical information of everyone in the hospital, staff and patients included.
- A desktop CLI application that has a minimalistic GUI.
Value Proposition:
With its organized and portable database and its features to improve efficiency,
HealthVault aspires to help its users achieve the following results:
- Improve working speed of nurses, as they can store and retrieve critical information quickly and accurately.
- Minimize administrative errors with its inbuilt cross validation.
- Easy implementation within a hospital environment with minimal setup steps and data re-usability.
Every second matters in the healthcare industry when patient lives are at stake. We believe that HealthVault can help its users save those precious seconds.
Appendix B: User Stories
| Priority | As a… | I want to… | So that I can… |
|---|---|---|---|
| * * * | nurse | quickly refer to usage instructions | quickly get on track with the workflow |
| * * * | nurse | add a new staff/patient | record information of staff and patients |
| * * * | nurse | delete staff/patients | remove entries i no longer need |
| * * * | nurse | view all staff | quickly get an overview of staff |
| * * * | nurse | quickly add schedules for nurses and appointments for doctors | reduce the waiting time for patients |
| * * * | nurse | quickly look up schedules for both nurses and doctors | plan my schedule better |
| * * * | nurse | delete schedules/appointments | eliminate wasted time and resources |
| * * * | nurse | quickly add/delete inventories | manage our inventories better |
| * * * | nurse | quickly look up inventories | plan what and when to restock our supplies |
| * | nurse | have the program recognize slight errors in typing | have leeway working in a high-stress environment |
Appendix C: Non Functional Requirements
-
Should work on any Mainstream OS if it has Java 11 or above installed.
-
Database should be able to hold up to 1000 patients, staff, appointments, nurses’ schedules, and inventory without feeling a noticeable lag in the program.
-
A user with above average typing speed should be able to accomplish most of the tasks faster using commands than using the mouse.
-
The data retrieval time should return near instant without feeling a pause in between command and output.
-
New features for example, auto generation of nurses’ schedules and personalized account login are currently in the works to demonstrate that this program is still being developed to be better and accommodate more of the concerns nurses have.
-
Application would be affordable to the general masses.
-
The security and accessibility of the system is relatively secure, but authorization and authentication scheme is in consideration to be implemented for greater protection.
-
All data process and management is in accordance to Singapore IMDA and MOH policy.
-
Healthvault is not accountable for any data lost due to individuals computer failure.
Appendix D: Glossary
-
Illegal Characters - Non-alphanumeric characters
-
Collection - Any group of objects. In this case, we utilise an ArrayList to store all our objects.
-
Features - In this case, we refer to the entire interaction with the various types of objects. E.g. any interaction with Staff/Patient/Doctor Appointment/Nurse Schedules/Inventory.
-
Functionalities - Any command that is given to the feature. E.g.
helpcommand,listcommand. -
Blank Input - Refers to any whitespace input. E.g. “ “, “\t”.
-
No Input - Refers to no input given.
-
Mainstream OS - Windows/macOS/Linux
Appendix E: Instructions for Manual Testing
Given below are instructions to test HealthVault manually.
- These instructions only provide a starting point for testers to work on; testers are expected to do more exploratory testing.
- You can refer to the User Guide for further information regarding the command formats.
Launching HealthVault
Initial launch of HealthVault
1. Download the jar file here and copy into an empty folder.
2. Open up a command window to that folder with the jar file.
3. Run the command java -jar tp.jar
Expected: HealthVault will be loaded, and a welcome message will be shown. Ensure that the version number in the welcome matches version of the jar file downloaded.
Start Menu
Choose a directory from the Start Menu
ℹ️ Ensure that the location that you are trying to access is in the Start Menu or else an error message will pop up.
1. Test case: staff (where you will be directed to the Staff Menu)
Expected:
Welcome to Staff Menu!
Type "help" for staff menu commands
2. Test case: patient (where you will be directed to the Patient Menu)
Expected:
Welcome to the patient Commands section!
Type "help" for patient menu command
3. Test case: appointments (where you will be directed to the Appointments’ Menu)
Expected:
Welcome to the Appointments' Menu!
Type 'help' for appointment menu commands
4. Test case: schedules (where you will be directed to the Schedules’ Menu)
Expected:
Welcome to Nurse Schedules!
Type "help" to for nurse schedules commands
5. Test case: inventory (where you will be directed to the Staff Menu)
Expected:
Welcome to Inventory Menu!
Type "help" for Inventory menu commands
6. Test case: help (where you will be directed to the Help Menu)
Expected:
Commands       Description                             Format
____________________________________________________________________________________________________
staff          To go to staff                          -
patient        To go to patients                       -
appointments   To go to doctors appointments           -
schedules      To go to nurse schedules                -
inventory      To go to inventory                      -
help           To see what commands for Start Menu     -
exit           To exit the application                 -
7. Test case: exit (where you will exit the program)
Expected: Goodbye! Have a nice day!
Choose which feature you want to use from Staff Menu
- Adding a new staff
- Make sure that the inputted user ID starts with a D (for doctor ID) or N (for nurse ID) and has exactly 5 digits in the number following!
- Any input field in HealthVault only accepts space and alphanumeric characters
- The age field input should be a positive integer starting from 0 but less than 150
Positive Test case: add/D12345/MingShun/30/Pediatrician
Expected: Doctor MingShun hired :)
Negative Test case: add/D1/MingShun/40/Pediatrician
Expected:
Error in Staff ID input
Please input with the following format [D/N][5 digit ID number]
- Deleting staff
- Make sure that the inputted user ID starts with a D (for doctor ID) or N (for nurse ID) and has exactly 5 digits in the number following!
Positive Test case: delete/D12345
Expected: D12345 has been fired :(
Negative Test case: delete/Owen
Expected:
Error in Staff ID input
Please input with the following format [D/N][5 digit ID number]
- Listing all doctors and nurses
- <> implies that the inputs are optional
3.1
Positive Test case: list/nurses
Expected:
ID         | Name       | Age   | Specialisation
____________________________________________________________
N12345     | Sarrah     | 30    | Emergency
Negative Test case: list/
Expected:
Invalid List command parameter
Please input with the either of the following format:
list
list/nurses
list/doctors
3.2
Positive Test case: list/doctors
Expected:
ID         | Name       | Age   | Specialisation
____________________________________________________________
D12345     | MingShun   | 30    | Pediatrician
3.3
Positive Test case: list
Expected:
ID         | Name       | Age   | Specialisation
____________________________________________________________
N12345     | Sarrah     | 30    | Emergency
D12345     | MingShun   | 30    | Pediatrician
D12355     | Alex       | 28    | Oncology
Negative Test case: list/blahblah
Expected:
Invalid List command parameter
Please input with the either of the following format:
	list
	list/nurses
	list/doctors
- Finding a staff
- Any keyword input will be searched through every field of Staff details. i.e. It can be used to search Staff ID, name, age and specialisation.
Positive Test case: find/Oncology
Expected:
ID         | Name       | Age   | Specialisation
____________________________________________________________
D12355     | Alex       | 28    | Oncology
Negative Test case: find/
Expected:
OOPS! There are too few inputs for this command
- Returning to Start Menu
Test case: return
Expected: Returning to start menu!
- Directing to help function
Test case: help
Expected:
Here is a list of Staff commands:

Commands  Description                                                 Format
____________________________________________________________________________________________________
help      Brings up the list of commands for Staff!                   -
add       Adds Staff details to the Staff database!                   add/[Staff ID]/[Name]/[Age]/[Specialisation]
list      Brings up the list of all current Staff in database!        list/<input>, where input == doctor or nurse
delete    Deletes the Staff with the specified ID from the list!      delete/[Staff ID]
find      Finds a matching Staff using a keyword or phrase!           find/[keyword or phrase]
return    Returns you to the Start Menu!                              -
Choose which feature you want to use from Patient Menu
- Adding a new patient
- Make sure that the inputted user ID starts with an upper case P and has exactly 5 digits in the number following!
Example:
P12345,P54321
- Any input field in HealthVault only accepts space and alphanumeric characters.
- The gender field input is case-insensitive but should only be “M”, “F” or “Others” or any other upper and lower case versions.
- The age field input should be a positive integer including 0, starting from 0 to inclusive of 150.
Positive Test case: add/P55555/Sam/40/M/Fever/Paracetamol
Expected: Sam is now a patient here!
Negative Test case: add/P1/Jill/40/F/Covid19/Macrolides
Expected:
Error in Patient ID input
Please input with the following format [P][5 digit ID number]
- Deleting a patient
- Make sure that the inputted user ID starts with an upper-case P and has exactly 5 digits in the number following!
Example:
P12345,P54321
Positive Test case: delete/P55555
Expected:
Noted. I've removed this patient:
Sam
Now you have 0 patients in the list
Negative Test case: delete/P123456
Expected:
Error in Patient ID input
Please input with the following format [P][5 digit ID number]
- Listing all patients
Positive Test case: list
Expected:
Here are the patients currently in the list!
ID       | Name                 | Age    | Gender   | Illness              | Medication Required
____________________________________________________________________________________________________
P55555   | Sam                  | 40     | M        | Fever                | Paracetamol
P12345   | Amy                  | 35     | F        | Flu                  | Panadol
Negative Test case: list/a
Expected: OOPS! There are too many inputs for this command
- Finding a patient
- Any keyword input will be searched through every field of Patient details. i.e. It can be used to search Patient ID, name, age, illness, medication required. The keyword input can be case-insensitive and still find matches in the database.
4.1
Positive Test case: find/P55555
Expected:
ID       | Name                 | Age    | Gender   | Illness              | Medication Required
____________________________________________________________________________________________________
P55555   | Sam                  | 40     | M        | Fever                | Paracetamol
Negative Test case: find/
Expected: OOPS! There are too few inputs for this command
4.2
Positive Test case: find/Sam
Expected:
ID       | Name                 | Age    | Gender   | Illness              | Medication Required
____________________________________________________________________________________________________
P55555   | Sam                  | 40     | M        | Fever                | Paracetamol
Negative Test case: find/Same
Expected: There is no patient in the list that matches your keywords!
- Returning to Start Menu
Test case: return
Expected: Returning to start menu!
- Directing to help function
Test case: help
Expected:
Here is a list of Patient commands:

Commands  Description                                                 Format
__________________________________________________________________________________________________________________________________________
help      Brings up the list of commands for Patient!                 -
add       Adds Patient details to the Patient database!               add/[Patient ID]/[Name]/[Age]/[Gender]/[Illness]/[Medication Needed]
list      Brings up the list of all current Patient in database!      -
delete    Deletes the Patient with the specified ID from the list!    delete/[Patient ID]
find      Finds a matching Patient using a keyword or phrase!         find/[keyword or phrase]
return    Returns you to the Start Menu!                              -
Choose which feature you want to use from Appointments’ Menu
- Adding a new appointment
- Make sure that the inputted doctor/appointment ID starts with an upper-case D/A and have exactly 5 digits in the number following!
- Any input fields in HealthVault only accepts space and alphanumeric characters.
- The gender field input should only be “M”, “F”.
- This function allows the adding of past appointments.
Positive Test case: add/D12345/A12345/Alex/M/21012021
Expected: Appointment Added
Negative Test case: add/D3/A12345/Alex/M/21012021
Expected:
Error in Doctor ID input
Please input with the following format [D][5 digit ID number]
- Deleting an appointment
- Make sure that the inputted doctor/appointment ID starts with a D/A and have exactly 5 digits in the number following!
2.1
Positive Test case: delete/D12345
Expected: DoctorID / Appointment ID: D12345/A12345 has been deleted!
Negative Test case: delete/D123
Expected:
Error in ID input
Please input with the following format [D/A] followed by [5 digit ID number]
2.2
Positive Test case: delete/A54321
Expected: Appointment ID: A54321 has been deleted!
Negative Test case: delete/A123
Expected:
Error in ID input
Please input with the following format [D/A] followed by [5 digit ID number]
- Listing appointments
- Make sure the input
allis lower caps.- Make sure that the inputted doctor/appointment ID starts with a D/A and have exactly 5 digits in the number following!
3.1
Positive Test case: list/all
Expected:
Doctor ID      | Appointment ID | Name           | Gender         | Date
____________________________________________________________
D11111         | A54321         | Owen           | M              | 01/04/2021
D12345         | A12345         | Alex           | M              | 21/01/2021
Negative Test case: list/a
Expected:
Error in ID input
Please input with the following format [all/D/A] followed by [5 digit ID number]
3.2
Positive Test case: list/D12345
Expected:
Doctor ID      | Appointment ID | Name           | Gender         | Date
____________________________________________________________
D12345         | A12345         | Alex           | M              | 21/01/2021
Negative Test case: list/D111
Expected:
Error in ID input
Please input with the following format [all/D/A] followed by [5 digit ID number]
3.3
Positive Test case: list/A12345
Expected:
Appointment ID | Name           | Gender         | Date
____________________________________________________________
A12345         | Alex           | M              | 21/01/2021
Negative Test case: list/A111
Expected:
Error in ID input
Please input with the following format [all/D/A] followed by [5 digit ID number]
- Returning to Start Menu
Test case: return
Expected: Returning to Start Menu!
- Directing to help function
Test case: help
Expected:
Here is a list of Doctor Appointments Commands:
Commands  Description                                                           Format
____________________________________________________________________________________________________
help      Brings up the list of commands for Doctor Appointments!               -
add       Adds Doctor Appointment details to the database!                      add/[Doctor ID]/[Appointment ID]/[Name]/[Gender]/[Date (DDMMYYYY)]
list      Brings up the list of all current Doctors' Appointments in database!  list/[all/DoctorID/AppointmentID]
delete    Deletes the Appointment with the specified ID from the list!          delete/[DoctorID/Appointment ID]
return    Returns you to the Start Menu!
Choose which feature you want to use from Schedules’ Menu
- Adding a new schedule
- Make sure Nurse ID exists in Staff and Patient ID exists in Patients before adding.
- Make sure that the inputted user ID starts with an N for Nurse, P for Patient and have exactly 5 digits in the number following!
- Any input fields in HealthVault only accepts space and alphanumeric characters.
- HealthVault currently only allows the adding of 1 schedule per patient per day.
Positive Test case: add/N12345/P12345/30012020
Expected: Trip to P12345 on 30/01/2020 added!
Negative Test case: add/N1/P12345/30012020
Expected:
OOPS! Looks like your ID value is incorrect!
Please ensure that the ID includes 5 numbers after "N" or "P"
eg. N12345 or P67891
- Deleting schedule
- Make sure that the inputted Nurse ID starts with an N for Nurse, and have exactly 5 digits in the number following!
- HealthVault only accepts valid Date inputs.
Positive Test case: delete/N12345/30012020
Expected: Trip to P12345 on 30/01/2020 has been cancelled!
Negative Test case: delete/N1/30012020
Expected: NurseID does not exist! Please check Staff List and try again!
- Listing schedules
- Make sure that the inputted Nurse ID starts with an N for Nurse, and have exactly 5 digits in the number following!
3.1
Positive Test case: list/N12345
Expected:
Nurse ID   | Patient ID | Date
____________________________________________________________
N12345     | P12345     | 30/01/2020
Negative Test case: list/N1
Expected: NurseID does not exist! Please check Staff List and try again!
3.2
Positive Test case: list/all
Expected:
Nurse ID   | Patient ID | Date
____________________________________________________________
N12345     | P12345     | 30/01/2020
N55555     | P55555     | 30/01/2020
Negative Test case: list
Expected:
OOPS! Please check to see if your command is properly formatted!
Please input with the following format: list/[NurseID/all]
- Returning to Start Menu
Test case: return
Expected: Returning to start menu!
- Directing to help function
Test case: help
Expected:
Here is a list of Nurse Schedule commands:
Commands  Description                                                      Format
____________________________________________________________________________________________________
help      Brings up the list of commands for Nurse Schedule!               -
add       Adds Nurse Schedule details to the database!                     add/[Nurse ID]/[Patient ID]/[Date (DDMMYYYY)]
list      Brings up the list of all current Nurse Schedules in database!   list/[NurseID/all]
delete    Deletes the Schedule with the specified ID from the list!        delete/[Nurse ID]/[Date (DDMMYYYY)]
return    Returns you to the Start Menu!                                   -
Choose which feature you want to use from Inventory Menu
- Adding a new item or increasing quantity of current items.
- Make sure that the inputted price is valid and does not have more than 2 decimal places!
- Any input fields in HealthVault only accepts space and alphanumeric characters!
- Avoid using uppercase letters!
Positive Test case: add/paracetamol/3/90
Expected: 90 paracetamol is added into Inventory!
Negative Test case: add/paracetamol/bc$3*/90
Expected: Please enter a valid price!
- Decreasing quantity of items.
- Avoid using uppercase letters
Positive Test case: delete/paracetamol/20
Expected: Noted. I've removed 20 paracetamol
Negative Test case: delete/paracet/20
Expected: OOPS! This item does not exist in the Inventory!
- Listing all items
Positive Test case: list
Expected:
ItemName        | Price      | Quantity
------------------------------------------------------------

paracetamol     | 3.00       | 70
panadol         | 4.80       | 36
Negative Test case: list/hello/34
Expected: OOPS! There are too many inputs for this command
- Returning to Start Menu
Test case: return
Expected: Returning to start Menu!
- Directing to help function
Test case: help
Expected:
Here is a list of Inventory commands:

Commands  Description                                                 Format
____________________________________________________________________________________________________
help      Brings up the list of commands for Inventory!               -
add       Adds Inventory details to the database!                     add/[Item name]/[Price]/[Quantity]
list      Brings up the list of all current Inventory in database!    list
delete    Deletes the Inventory item from the list!                   delete/[Item Name]/[Quantity]
return    Returns you to the Start Menu!                              -